1. Create a secure password
The first step in keeping your Facebook account safe and secure is one that also applies to any of your personal online accounts: creating a password that’s a little tougher to crack than “password.”
The tech gurus as Microsoft recommend creating a password that’s no less than eight characters, complete with letters, numbers, symbols and punctuation. You should also avoid using easy-to-guess words—like, say, your daughter’s first name, or the name of your beloved Labrador.
And not only should you use a unique passwords for all your online accounts, including Facebook, you should also change your passwords as often as you can stand.
And not only should you use a unique passwords for all your online accounts, including Facebook, you should also change your passwords as often as you can stand.
Not the easiest advice to follow, I know; indeed, I’d be lying if I told you I change my Facebook password once a week. But going with a password more complex than “myname99″ is, at the very least, a good start.
2. Turn on secure browsing
Ever log on to Facebook with your laptop over a public Wi-Fi hotspot? If so, consider this: hackers can easily “sniff” the wireless data that’s flowing through unprotected hotspots in cafés, parks and other public spaces, meaning they can essentially see almost everything you’re doing online, including on Facebook.
The good news is that you can browse Facebook over a “secure” web connection that’s far tougher (though not impossible) for hackers to crack. Here’s how to do it:
- Click the downward arrow in the top-right corner of any Facebook page, then select Account Settings.
- In the left column of the next page, click Secutiry, then click the “edit” link next to Secure Browsing.
- Click the “Browse Facebook on a secure connection (https) when possible)” checkbox.
Now, when you check your Facebook account, you’ll see “https://” (rather than plain-old “http://”) at the beginning of your web browser’s address bar, which means you’re browsing the web over a (mostly) secure connection.
3. Turn on login notifications
Even the strongest of strong passwords and “secure browsing” won’t stop a determined hacker from sneaking into your Facebook account, and that’s where this next security precaution comes in handy.
You can set Facebook to warn you whenever someone logs into your account from an “unrecognized” device—that is, something other than the laptop, phone, or desktop PC that you use for Facebook each day.
You can set Facebook to warn you whenever someone logs into your account from an “unrecognized” device—that is, something other than the laptop, phone, or desktop PC that you use for Facebook each day.
Here’s how:
- Click the downward arrow in the top-right corner of any Facebook page, click Account Settings, then click Security in the left column.
- Next, click the Edit link next to Login Notifications. Once you enable this setting, you’ll get a warning if someone tries to log into your Facebook account over a new device. All you have to do is choose how you’d like to be notified: via email or text message (provided you’veregistered your cell phone number with Facebook).
- Finally, click the Save Changes button. You’re done.
From now on, you’ll be prompted to name any device you use to log into Facebook, and you’ll be able to track your “recognized” Facebook devices from the Security Settings page.
4. Turn on login approvals
While login notifications do a great job of warning you if someone’s trying to pry their way into your Facebook account, they won’t actually stop anyone from breaking in if they’ve managed to snag your Facebook password. That’s where login approvals come in.
Here’s how they work: whenever anyone—either you or someone else—tries to log into your Facebook account on an “unrecognized” device, they’ll have to enter a secret, one-use-only code that’s sent via SMS to your cell phone. No code, no entry.
It’s a clever way to keep ne’er-do-wells from trying to pry their way into your Facebook account; then again, it can backfire if you’re trying to log into Facebook from a new PC and you don’t have your cell phone, or if your cellular connection conks out.
Still want to try login approvals? Here’s how:
- Once again, click the downward arrow in the top-right corner of a Facebook page, click Security in the left column, then click the “Edit” link next to Login Approvals.
- Click the “Require me to enter a security code” checkbox, then follow the prompts.
- Part of the setup process involves Facebook sending an initial security code to the cell phone number you’ve registered on your Facebook account (and yes, you’ll be prompted to register a wireless number if you haven’t done so already).
That’s it! Just make sure to keep your phone handy if you’re planning on logging into Facebook from a device you haven’t used before.
Change your mind about login approvals? If so, just go back to the Security Settings page (under Account Settings), click the Edit link next to Login Approvals, clear the checkbox, and click Save Changes.
5. Sign out of any “remote” Facebook sessions
Ever worry that you signed in to Facebook on a friend’s computer or a PC in a conference room but forgot to sign out? I know the feeling. Luckly, it’s easy to log out of any so-called “remote” Facebook sessions, even when you’re sitting at home in front of your personal desktop.
- Go to the Security Sessions: click the downward arrow in the top-right corner of any Facebook page, click Account Settings, then click Security in the left column.
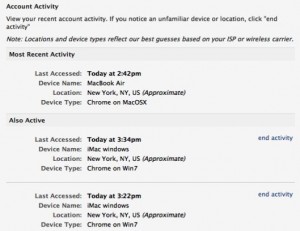
- Click the Edit link next to Active Sessions, then take a look at the list of your recent “sessions” that Facebook thinks are still active.
- See any you don’t recognize—or, perhaps, one from a public PC that you do recognize? If so, click the “End Activity” link next to the session in immediately log out of it.
- source;heres the thing


0 comments:
Post a Comment